sql-database
Setup for Databases module
To follow this module you need to prepare 3 things:
- Install MySQL, the SQL database you will use
- Install DBeaver, an application to ease interacting with the database
- Setup the
worlddatabase in DBeaver
This guide provides step-by-step instructions on how to install these on different operating systems: macOS, Ubuntu, and Windows.
[!WARNING] If you’re using a different operating system, please find your way through other resources.
Installing My SQL
macOS
Using Homebrew
-
Open your Terminal.
-
Install Homebrew if you haven’t already:
$ /bin/bash -c "$(curl -fsSL https://raw.githubusercontent.com/Homebrew/install/HEAD/install.sh)"
- Install MySQL using Homebrew:
$ brew install mysql
- Start MySQL service:
$ brew services start mysql
[!TIP] If you install MySQL via Homebrew, the default username is
root, and there is no password.
Ubuntu
Using APT Package Manager
-
Open your Terminal.
-
Update the package list:
$ sudo apt update
- Install MySQL Server:
sudo apt install mysql-server
-
During the installation, you might be prompted to set a root password for MySQL. Do not forget it if you are.
-
Start the MySQL service:
sudo service mysql start
- If you were not prompted to set a root password for MySQL during installation, run
sudo mysql, which will create a MySQL shell, and in it run the following commands to set one now:ALTER USER 'root'@'localhost' IDENTIFIED WITH mysql_native_password BY '<your_root_password_here>'; FLUSH PRIVILEGES; exit;
Using MySQL APT Repository
-
Visit the MySQL APT repository page: MySQL APT Repository.
-
Download the repository package for Ubuntu and install it.
-
Update the package list:
$ sudo apt update
- Install MySQL Server:
$ sudo apt install mysql-server
-
During the installation, you might be prompted to set a root password for MySQL. Do not forget it if you are.
-
Start the MySQL service:
$ sudo service mysql start
- If you were not prompted to set a root password for MySQL during installation, run
sudo mysql, which will create a MySQL shell, and in it run the following commands to set one now:ALTER USER 'root'@'localhost' IDENTIFIED WITH mysql_native_password BY '<your_root_password_here>'; FLUSH PRIVILEGES; exit;
Windows
-
Download the MySQL Installer for Windows from the official website: MySQL Downloads.
-
Run the installer executable and follow the installation wizard’s instructions.
-
During installation, set up a root password for MySQL.
-
Choose the components you want to install. Select at least MySQL Server.
-
Once the installation is complete, start the MySQL service using the MySQL Command Line Client or MySQL Workbench.
[!IMPORTANT] Store the password you chose in a secure but handy place. You’re going to need it throughout the module.
Verification
To verify that MySQL is installed and running, open your Terminal or Command Prompt and run the following command:
$ mysql -u root -p
You will be prompted to enter the root password you set during installation. If MySQL is successfully running, you will be logged into the MySQL command-line interface.
Installing DBeaver
You can interact with a MySQL database directly from your terminal using the mysql shell. However, it’s more convenient to use a separate application - a SQL client.
DBeaver is a free, open source SQL client that works on macOS, Linux, and Windows that supports MySQL and many others SQL database engines. We recommend installing and using it during the module.
macOS and Windows
- Go to DBeaver’s Download page
- Choose your OS and download the respective installer.
- Open the installer and follow the instructions.
Ubuntu
- Add DBeaver to your list of repositories
$ sudo add-apt-repository ppa:serge-rider/dbeaver-ce
- Update your package list
$ sudo apt-get update
- Install DBeaver
$ sudo apt-get install dbeaver-ce
Setting up the world database
For the exercises we’ll be using an example database (world), so we must set it up.
To install the sample database, follow these steps:
- If you haven’t already, clone this repository and enter its directory:
$ git clone git@github.com:HackYourFutureBelgium/sql-database.git
$ cd sql-database
- Import the
worlddatabase:
$ mysql -u "root" -p < "week1/databases/world.sql" # enter your password when asked
This will connect to your MySQL server and execute the world.sql script.
- Connect again to the MySQL server to confirm the
worlddatabase is installed correctly.
$ mysql -u "root" -p # enter your password when asked

mysql> USE world;
mysql> SHOW TABLES;
You should see an output similar to the following:
+-----------------+
| Tables_in_world |
+-----------------+
| city            |
| country         |
| countrylanguage |
+-----------------+
3 rows in set (0.00 sec)
- Instead of using your terminal, we recommend using DBeaver to interact with the database:
- Open DBeaver
- On the left sidebar (“Database Navigator”), click “New Database Connection”
- Choose
MySQLas driver

- Enter the following information:
- Server Host:
localhost - Database:
world - Username:
root - Password:
<your-password>(can be blank if you installed via Homebrew)
- Server Host:
You should now see the world database and its tables on the Database Navigator:

- Open a SQL console by by right-clicking
world -> SQL Editor -> New SQL console

- Then write a sample command:
SHOW TABLES;
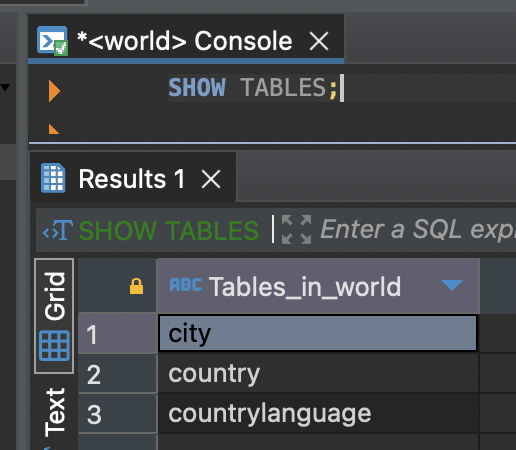
If you see the sample above, everything is ok! You have successfully connected to the world database and can follow along to this week’s Readings and Exercises).